
Lemon RX DSMX 수신기 바인딩 2015년 11월 17일 – Posted in: 리뷰 – Tags: lemon rx, spektrum

레이븐퓨리에서 방제종합관리솔루션 베타버전의 개발을 완료하고 전국구 방제사를 모집하고 있습니다. 방제사 등록을 누르시면 상세 페이지를 새로 엽니다.
Lemon RX DSMX 수신기 바인딩
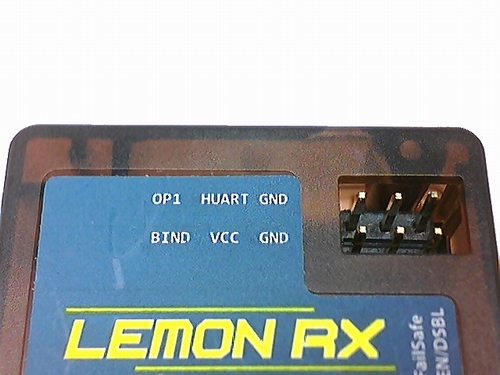
바인딩 플러그를 바인딩포트에 꽂고 바인딩버튼을 누른상태에서 전원을 인가하면 됩니다.
Binding
Binding is the process of “locking” the receiver to its own transmitter so that it ignores any others in the area. Binding is the first step in setting up any receiver. Ensure the transmitter and receiver are separated by at least 6 ft/2m or the transmitter may “swamp” the receiver. In some cases it may be necessary to have 10ft/3m or more separation to achieve binding. Generally you should only need to bind once and, after binding, normal link-up should not require more than a couple of feet of separation.
Step 1. Power up the receiver in bind mode
For most receivers: put the bind plug on to the bind pins. For 6channel Ultra Light and Micro Light receivers, press and hold in the bind button.
Connect a suitable power source to the receiver throttle servo pins. This can be:
• a receiver pack battery; or
• a stand-alone BEC; or
• the throttle connection from your speed controller (ESC) with inbuilt BEC (if the ESC is in a model, disconnect the motor or remove the propeller).
The red LED on the receiver will flash rapidly to indicate bind mode. If it doesn’t, you have a problem (such as reversed power connector). Make sure it is flashing before going any further.
Step 2. Turn on transmitter in bind mode
On some transmitters bind mode is activated by holding the Trainer button/switch while powering up. Others require going into a menu to enable bind mode. Lemon Receiver Instructions 13-Dec-14 2 Continue to hold the switch/button until the receiver LED stops flashing. Release it at that point and the bind process will complete. A solid light on the LED indicates successful bind.
Some transmitters will display on screen the type of bind (DSM2 or DSMX) and the frame rate (normally 22mS).
Step 3. Power down
Remove power from the receiver, remove the bind plug, switch the transmitter off and back on, then apply power to the receiver. Check that the receiver is operating properly and that servos respond to the transmitter controls.
NOTES:
1. If your receiver uses a satellite then binding must be done with the satellite connected. Both receiver and satellite LEDs should flash rapidly, then become solid.
2. Binding can be done with or without servos. Servos plugged in the wrong way round may prevent binding, so check this if you have difficulty.
3. Always perform a range check after binding, using the range check function on your transmitter. This attenuates transmitter power so that range is reduced by a factor of about 30. With Spektrum and similar transmitters, full control in range check mode at 30 yds/25m (roughly 30 paces for many adults) indicates ample range for normal visual flying. It is good practice to perform a range check at the beginning of every day’s flying to ensure everything is working properly.
What the LEDs mean
All Lemon receivers and satellites have a red LED. Some, including the 7channel stabilizer, also have a green LED.
1. A rapidly flashing red LED indicates the receiver is in Bind mode
2. A solid red LED indicates normal radio link between receiver and transmitter.
3. No red LED means there is no radio link.
4. A slowly flashing red LED on a receiver in DSM2 mode indicates that there has at some stage been a power loss (however brief), sometimes called a “brown out”. The flashing may indicate an inadequate receiver power supply or it may mean simply that the operator failed to turn off the transmitter when powering down the receiver. It does not indicate a range issue. Receivers in DSMX mode do not provide “brownout warning”.
5. On the 8/10 channel DSM2 and10 channel DSMX receivers a rapidly flashing Green LED at power up indicates 11mS frame rate mode.
6. On receivers equipped with a failsafe button, a solid green LED indicates that user-defined preset failsafe is enabled. No green LED indicates that failsafe is in the default throttle-only mode. This is explained below.
7. The 7ch stabilizer has both red and green LEDs that are used to indicate binding, version and stabilization status. See the separate stabilizer instructions for information on setting up the stabilizer.